Feri Grimoire Learn more about Feri Training HOME


Faery Flower Service

Faery Tradition on Google Plus

See Feri Tradition's Twitter Feed

Friend us on Facebook

Connect with Feri Tradition on Tumblr

Read our Faery Tradition Blogger Blog

Read our Faery Tradition blog on Live Journal

Subscribe to our Faery Tradition blog on Wordpress

Subscribe to ourFaery Tradition  RSS feed

Visit our Faery Pinterest boards

Site Map for Faery Tradition History of Faery Tradition Practices of the Faery Tradition Sorcery Deities of Faery Tradition Guardians and Directional Goddesses of Fary Tradition Mighty Dead Ancestors of Faery Tradition F.A.Q. Frequently Asked Questions about Faery Tradition
     
 
HOW TO PRESS FLOWERS

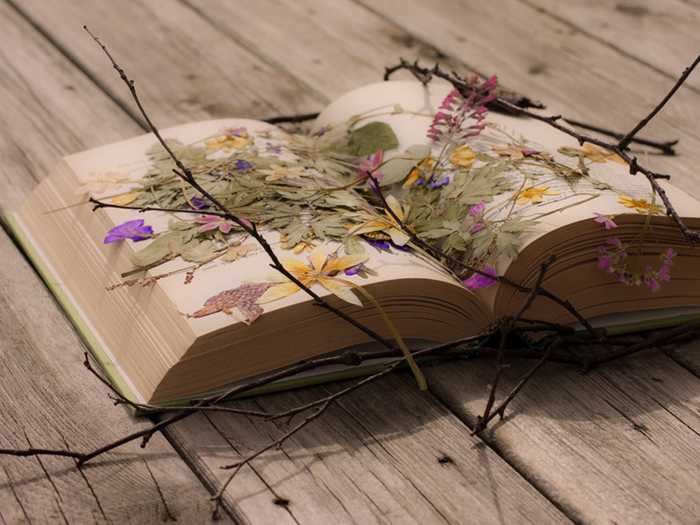
Perhaps the simplest manner of pressing flowers is what many of us did as a child...

1. Use flowers that are dry and free of debris and insects. Remove unwanted parts of the plant, potentially stem and leaves.

2. Flatten out your flowers. Buds are harder to press than radial blooms. Petals may be removed from their thick core and repositioned on the paper to reflect their natural state.

3. Find a thick book. Because this is magical work you may wish to utilize a sacred book, such as the Bible or other grimoire. There is potential for moisture from the petals to crinkle or discolor your book, so you may wish to dedicate a book solely for the purpose of flower pressing.

4. Place your flowers between two sheets of paper, and place these within the book. Leave space between each flower or else they will stick together.

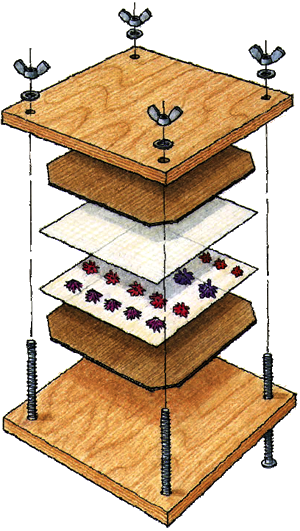
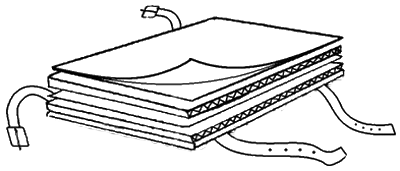
5. Close the book and wait. If the book is heavy enough then you may not need to weight it, otherwise you may need to place something heavy upon it or hold it tight with a belt or other type of strap. Similarly, you can use the technique below and no book is required.

 
To Reconcile
How To Create A Flower Press
#1

1. Cut 2 pieces of plywood into a rectangular shape, 9" X 12" works well.

2. Cut sheets of cardboard the same size as the plywood.

3. Simply layer plywood, paper, flowers, paper, cardboard, and so on, stacking one atop the other.

4. Place the other piece of plywood on the top, then tighten two belts around the stack.


With this technique of flower pressing, as with the one to follow, the fixture will need to be taken apart every three days or so to remove trapped moisture.

To Reconcile
How To Create A Flower Press
#2


1. Cut 2 plywood squares, 9" X 9".

2. Drill holes measured 1/2" in from each corner, wide enough for your screws to fit through.

3. Cut 4 squares of cardboard 9" X 9" and drill holes to match those in the boards.

4. Sand the surfaces and edges of the plywood to reduce slivering.

5. Fit 4 bolts 4" or longer through a piece of plywood, and sit the plywood down so that the screws sit erect.

6. Place a sheet of cardboard through the screws and push it down against the bottom.

6. Sandwich flowers between 8" X 8" sheets of paper and stack upon the cardboard. Repeat if desired, layering with a sheet of cardboard between each endeavor.

7. Fit the other square of cardboard through the screws, add a washer to each screw, then screw tight with wing nuts.

To Reconcile
Microwave Technique


There are items on the market, such as the Microfleur, that are designed for use in the microwave. The benefits of this technique are that the flowers hold their color better without turning brown, and the process takes mere minutes rather than weeks. A simple way of doing this is to sandwich flowers between sheets of cotton, and those between hand towels, and then between two microwave safe dishes. Microwave on high for thirty seconds, then wait five minutes and repeat. Do so until flowers are dry. It helps to remove the top plate between heatings so let the moisture dissipate.


Faery Flower Service